Test game-Black Powder, Hangman's Creek Scenario Variant
When I began to war game again after an absence of 25 years I had the notion to do Black Powder in the ACW.
So after two years of painting and organizing and then using my friend's gorgeous 16' by 4' war game table we were ready to try Black Powder.
We were impressed with the rule set although it was quite different from most rules sets we game with or did game with when we started gaming in the early 1970s.
The author of Black Powder makes no bones about the game being a game for gentlemen where the looks of the game (often called gaming in the Grand Manner) is primary as is having fun. Winning or losing is decidingly secondary. We like that!
No where is this more important (being a gentleman, rules lawyers not welcome) than in the command system and the issuing of orders. Once my friend and I got the hang of issuing orders and being gentlemen about it the rest of the game flowed easily enough as we walked through the mechanics.
Although it was a test game to learn the mechanisms we had a great time and achieved our Grand Manner goals.
I took a number of pictures with my iPad and edited them on my Mac. They are not in any particular order but good practice for when I try to do a decent battle report once we play more Black Powder games in the ACW.
 |
| JZ's ACW train with a Matthew Brady vignette. The train yard was a CSA objective. |
 |
| JZ's ACW buildings representing Hangman's Creek. The detail on these buildings is amazing. |
 |
| The arms factory complex on the Union right. Again, the detail on these buildings is fantastic. That's coal next to the smoke stack and metal foundry chips adjacent to the building on the right. |
 |
| Outskirts of Hangman's Creek. Part of a South Carolina Brigade would come over the ridge in the back ground and attempt to cross the deadly ground of the wheat field. |
 |
| Two regiments of South Carolina troops would be deployed to the right of the river. They would eventually outflank the Union position near the arms factory. |
 |
| A farmstead on the Confederate right. A Texas Brigade would advance through the farmstead and drive toward the rail yard. |
 |
| The 1st US Cavalry is advancing from Hangman's Creek to take position in the wheat fields where they would dismount and delay the South Carolina Brigade's advance. The figures are 20mm metal by Newline Designs. |
 |
| This nifty bridge is on the Union right. It will be crossed by two South Carolina Regiments who would outflank the New York Regiment guarding it. The bridge is a vacuum form model. |
 |
| The 1st US Cavalry has reached the edge of the wheat field. |
 |
| The 1st US Cavalry dismounted and ready to receive the Rebs with their Sharp's carbines.The brigade officer is attached to inspire them! |
 |
| Front view of the Union cavalry. |
 |
| My friend has a "cut-away" wheat field where you can position your figures so they look like they are in the wheat field rather than on top. |
 |
| It's a neat effect and part of the pleasures of doing Grand Manner gaming. |
 |
| After the posed shot we had to remove the cut away. |
 |
| Another shot of the rail yard, this time a train car with three cannons. Clearly that's what the Rebs were after! |
 |
| Union train guard vignette. The figures are classic plastic Airfix from the 1960s. |
 |
| A better shot of the Matthew Brady vignette. I'm unsure of the manufacturer |
 |
| The Texas Brigade in march column advances across the farm stead. Most of the figures in this brigade are Musket Miniatures in 22mm metal. |
 |
| Part of the South Carolina Brigade advancing on the wheat field. The unit on the left is Hampton's Legion Infantry and the figs are classic Airfix. The unit on the right is ESCI (now Italeri). My ACW collection is a mixture of plastic and metal figures that range from 20mm to 23mm. |
 |
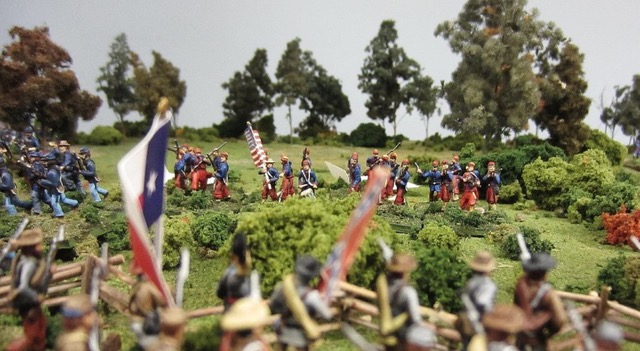
| The two South Carolina regiments on the Union right led by the dashing General Wade Hampton on a white horse! |
 |
| The Texas Brigade battle line is taking shape. |
 |
| Another of the South Carolina regiments in line of battle. The figures are Italeri. |
 |
| The hapless 119th New York. They had terrible dice and stood in position until getting flanked late in the game. The figures are a mix of IMEX. Revell and whatever else fit in. |
 |
| Union artillery battery moving into Hangman's Creek. The limber, cannon and crew are plastic IMEX. |
 |
| General Hampton pushes a regiment across the bridge. |
 |
| The 119th New York breaks much to the dismay of the 1st US Cavalry who are now very exposed! |
 |
| Another South Carolina regiment about the cross the bridge. Things look grim for the Yankees. |
 |
| The large 76th New York holds off the Texans behind the fence of the rail yard. The figures are again a mix of IMEX, Revell and I think Accurate. |
 |
| The small 14th Brooklyn Zouaves bravely facing the 3rd Arkansas and 2nd Texas. Most the Zouaves are 22mm metal from Musket Miniatures. |